Graphical user interface
The graphical user interface of the application consists of the main window and the certificate selection window.
Main application window
The main application window has a toolbar at the top. The application can operate in signing or viewing mode.
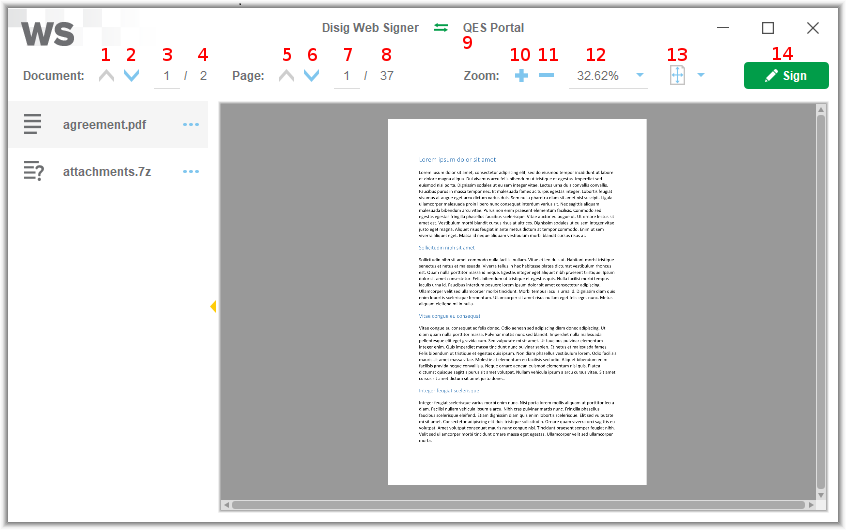
The following table describes the individual controls available in the main window:
| Control number | Control description |
|---|---|
| 1 | “Previous document” button Click the button to view the previous document when signing multiple documents. |
| 2 | “Next document” button Click the button to view the next document when signing multiple documents. |
| 3 | “Current document” field This field contains the number of the currently displayed document. You can also enter the number of the document you want to view in this field and confirm it by pressing the “Enter” key. |
| 4 | “Total number of documents” field This field contains the total number of documents being signed. |
| 5 | “Previous page” button Click the button to view the previous page of the document. |
| 6 | “Next page” button Click the button to view the next page of the document. |
| 7 | “Current page” field This field contains the number of the currently displayed page of the document. You can also enter the number of the page you want to view in this field and confirm it by pressing the “Enter” key. |
| 8 | “Total number of pages” field This field contains the total number of pages of the document. |
| 9 | “Server name” field The title of the main window always shows the name of the server the application is communicating with. The user is responsible for verifying that the application is communicating with the correct server. |
| 10 | “Zoom in” button Click the button to zoom in on the displayed page. |
| 11 | “Zoom out” button Click the button to zoom out of the displayed page. |
| 12 | “Current zoom” field This field contains the current zoom level of the displayed page and allows you to change it by selecting one of the predefined values. |
| 13 | “Original size” button Click the button to adjust the zoom level so that the page is displayed in its actual size (100%). “Full page” button Click the button to adjust the zoom level so that the entire page is displayed. “Page width” button Click the button to adjust the zoom level so that the full width of the page is displayed. |
| 14 | “Sign” button Click the button to start signing all documents that can be viewed with controls 1–4. This button is only available in signing mode. |
The application may ask the user to draw a rectangle in the area of the document where the visible signature should appear. At that point, the user interacts with the following component:
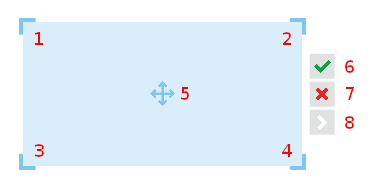
The following table describes the individual controls available in the component for defining the position of the visible signature:
| Control number | Control description |
|---|---|
| 1 | “Top-left corner” icon Click the icon and drag it to adjust the size of the rectangle where the visible signature will be placed. |
| 2 | “Top-right corner” icon Click the icon and drag it to adjust the size of the rectangle where the visible signature will be placed. |
| 3 | “Bottom-left corner” icon Click the icon and drag it to adjust the size of the rectangle where the visible signature will be placed. |
| 4 | “Bottom-right corner” icon Click the icon and drag it to adjust the size of the rectangle where the visible signature will be placed. |
| 5 | “Position” icon Click the icon and drag it to change the position of the rectangle where the visible signature will be placed. |
| 6 | “Confirm” button Click the button to confirm the position of the visible signature. |
| 7 | “Cancel” button Click the button to cancel the confirmed position of the visible signature. |
| 8 | “Continue” button Click the button to continue with the signing process. If the position of the visible signature has to be defined in multiple documents, the next document is displayed. Once the position is defined in all required documents, the process proceeds to the selection of the signing certificate. |
Certificate selection window
The certificate selection window clearly presents the available certificate stores and their contents. The user can choose the certificate that will be used to sign the documents.
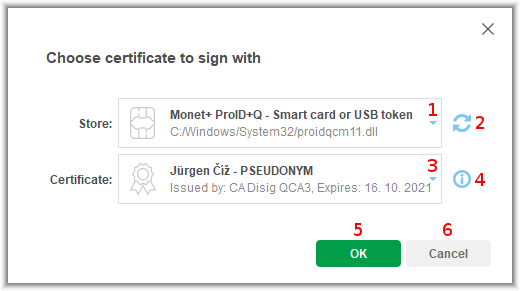
The following table describes the individual controls available in the certificate selection window:
| Control number | Control description |
|---|---|
| 1 | “Store” field This field contains the list of currently available signing certificate stores. When a store is selected, its certificates are shown in field no. 3. Depending on the type of the selected store, the application may ask the user to enter the PIN code needed to access the store. |
| 2 | “Refresh” button Click the button to reload the list of signing certificates from the selected store. |
| 3 | “Certificate” field This field contains the list of certificates available in the selected store. |
| 4 | “Certificate details” button Click the button to show or hide the details of the certificate selected in field no. 3. |
| 5 | “OK” button Click the button to confirm that you want to use the certificate selected in field no. 3. |
| 6 | “Cancel” button Click the button to close the certificate selection window and cancel the signing process. |